Tag Archives: home cooking

My Favorite Roasted Tomato Soup

I really like tomato soup in the fall.

I like it so much, I don’t think there’s a version of it out there that I haven’t liked: with rice or pasta, finished with cream, topped with tortilla strips and cilantro…they all make me really happy.

Except when it comes from a can.  Don’t get me wrong, I have totally been the girl who brings canned tomato soup in my thermos to work.  It just doesn’t make me particularly happy.  And, since it is tomato season, and I love to cook, here we are!  Ready to make a really great pot of homemade tomato soup that will make us all warm and cozy, leading us to break out any fuzzy socks that are waiting in the sock drawer and snuggle in.

For me, the key to a great tomato soup is to balance out the acidity of the tomatoes with some source of sugar.  Normally, plain white sugar is added to deal with this.  But a trick I learned a long time ago really solves the acidity problem in a way that doesn’t have us dumping sugar into our vegetables: add carrot.  I was taught to add chunks of carrot in the early steps of the soup making, and then to pluck them out before you served it.  It worked, and it did take away some of the bite of tomato soup.  But really, I thought, why take them out?  They add great color, great nutrients, and increase the sweetness factor in the finished product!  And they, like tomatoes, love to be roasted to develop all their great natural flavors.

I use onions, carrots, and fresh garden tomatoes drizzled with olive oil, salt and pepper as the base of this soup.
The three amigos, ready to get some crazy good flavor on.
They make a nice looking group, don’t they?  Nothing can really be bad when you start from someplace like this.
Roasted Tomato Soup
4 to 5 large tomatoes, cut into quarters and squeezed slightly
3 large carrots, peeled and cut into equal sized chunks
2 spanish onions, peeled and cut into chunks
3 large garlic cloves, peeled and cut in half
olive oil to drizzle
salt and pepper
6 cups vegetable or chicken stock
5 Tb tomato paste
1 14 oz can petite diced tomatoes
2 bay leaves
2 tsp dried thyme
1 Tb Spike seasoning, or any all-purpose seasoning
How-to:
  • Preheat oven to 400 degrees.  Take all your chopped veggies and lay them on a sheet pan or large casserole dish (there is going to be some liquid after they roast, so make sure you have a decent lip on the pan).  Drizzle olive oil, salt and pepper on them, and let the veggies roast on the bottom rack of the oven for 1 hour – taking them out to stir every 20  minutes or so. 

    Your kitchen is going to smell amazing. Just wait.
  • Once the veggies are done, pour the whole lovely lot of them into a large stock pot.  Don’t leave any of the juices in the baking dish!  Add your stock, tomato paste, can of diced tomato, bay leaf and seasonings, and bring to a boil.  Turn the heat down to medium or medium low and let it simmer for about 30 minutes.  Give it a taste, and adjust any seasonings if you need to.  If you feel like it isn’t sweet enough for you, then go ahead and add a tsp of sugar.  But remember, the amount of sugar you add is directly related to how much your soup will taste like canned soup!  So take it easy.
  • If you have an emersion blender – lucky you!  I really need to get one.  I only have a regular blender, so I get myself a large bowl and add about 3 ladles of soup into the blender and let it get nice and smooth before I put the now blended soup into the bowl.  I keep doing this until my soup pot is empty and I now have all my veggies blended together and happy.   **Important tip!  Don’t add too much hot soup to your blender (make it less than 1/2 full), or you will find that you and your walls are now covered in hot red liquid.

Here is where you get to make a choice about your finished soup.  Do you love it just as it is, all natural and slightly textured?  Or do you prefer to make it as smooth as you can?  If you are perfectly happy and can’t wait to dig in, then go get some kind of cheese sandwich and enjoy the rewards of your work!  Or, take this one extra step…

  • If you have a food mill or a fine strainer (or some cheesecloth, or painting mesh), pass the blended soup through it and it will remove any of the seeds and pulp that was left over from the blending step.

I used my fine strainer (or chinoise) and I got quite a bit of pulp out of the soup.

This step is totally optional!  For me, I usually only do it when I’m feeling very culinary or when the kids aren’t home to distract me.
Either way, I hope you take the plunge and start making your soup at home.  Try the original first, and then get crazy!  I like to confuse my kids by adding fun shaped pasta to it so they don’t give me any guff about how it is made from vegetables, but that’s just me.  Let me know how it goes!

Thai Peanut Noodles

Peanut noodles are just about the best things ever.  That is, I guess, unless you are allergic to peanuts, or hate fresh veggies, or have a problem with tasting joy.

I always have a lot of fun making stir-fry or asian noodle dishes, because as long as you get the main pillars of the recipe to stand up you’re free to add or remove anything your little heart desires.  This is not food chemistry, nothing will collapse or deflate or combust if you decide to tweak the recipe a little bit to your liking (I mean, you know, unless you’re subbing out red peppers for lighter fluid.  That would be  bad).

So here are the 3 pillars you need to stand up to make your fabulous dish:

  1. Nicely cooked rice noodles that aren’t too mushy or so undercooked that they lodge into your molars.
  2. A peanut sauce that is rounded out (this includes all the big Thai flavors – salty, sweet, tangy, and spicy).
  3. Veggies that are thinly sliced and that make you happy to eat.

Everything else is up to you!  Freedom!

My husband and I are trying to eat more vegetarian meals, so for us I decided to use tofu as a protein source.  But this dish is fantastic with cooked shredded chicken (rotisserie chickens were made for things like this).  I also happen to really like red peppers and cucumbers in mine, but you could add any kind of veggies you like: broccoli florets, carrot, celery, radish, bok choy…anything you want.  I like to garnish the noodles with chopped peanuts, but I didn’t have any on hand today and so I subbed in pumpkin and sunflower seeds.  Still super yummy!

Thai Peanut Noodles

Serves 4-6

1/2 package rice noodles

14 oz can bean spouts, drained

8 oz can water chestnuts, drained and sliced into strips

1 red onion, sliced into thin strips

1 red pepper, seeded and sliced into thin strips

1 cucumber, peeled, seeded and sliced into thin strips

1 pkg extra firm tofu (I like West Soy)

2 Tb Tamari (or soy sauce)

freshly ground pepper

1 tsp garlic powder

1 bunch scallions, chopped

For the Sauce:

3 cloves garlic, minced

1 tsp ginger, minced

*1/2 jar natural peanut butter (I like Smuckers Natural creamy)

3 Tb lime juice

6 Tb rice vinegar

2 Tb cider vinegar

1/4 c Tamari (or soy sauce)

5 Tb sugar (see * below)

fresh ground pepper

1 Tb Sriracha (this is the hot stuff…optional or to taste)

1 Tb Sesame oil

2 Tb water, if needed to thin the sauce

*If you want to use regular peanut butter, just decrease

or eliminate the added sugar listed in the recipe

For the tofu:

Preheat the oven to 375 degrees.  Slice the tofu in half width wise and press for 20 minutes until the liquid has been removed.  Cut the tofu into 1/4 inch strips and place in a large bowl.  Combine the 2 Tb tamari, garlic powder, and pepper in the bowl, and gently cover the tofu slices in the mixture.  Use cooking spray on a cookie sheet or sheet pan, and lay the tofu slices on it.  Cook for 10 minutes on one side, then flip over and cook 10 more minutes.  This baking helps make the tofu more firm and hold together better in the noodles – plus it helps my meat loving husband feel like he’s chewing on something besides noodles and veggies!  Once they are done, let them cool off and then cut them into smaller strips.

For the Sauce:

 Combine all the ingredients in a blender and blend until it is a smooth consistency.   You don’t have to use a blender, sometime I just mix them all up in a bowl!  But the blender does make it smooth.  Give the sauce a taste and decide if you need to adjust any of the flavors.  If it feels too tangy from the vinegar, add some more sugar or tamari.  If it seems too salty, add more sugar or water.  Just try to make sure you are hitting all the different flavors of Thai seasonings, and you should be good!

For the Rice Noodles:

In a large pot boil enough water that it will cover the noodles.  After the water has boiled, turn off the heat and remove the pan from the burner.  Add the noodles and let them sit in the hot water for 7 minutes, or until they are done.  Drain them in a colander and rinse with cold water until they are cooled off.

Now you are ready to take all the parts and combine them together into one big bowl of deliciousness!  I find that using my cleaned hands is a less messy and quicker way of mixing all these things together, rather than using tongs or forks.  Combine the noodles, sauce, veggies, and tofu until everything is really well-integrated.  Then, pop it in the fridge and let them flavors all come together for a couple of hours.

Don’t be surprised if when you take the noodles out of the fridge they have soaked up a lot of the peanut sauce.  If you need to, add a little bit of hot water to them and let them come to room temp, and you will be ready to go.

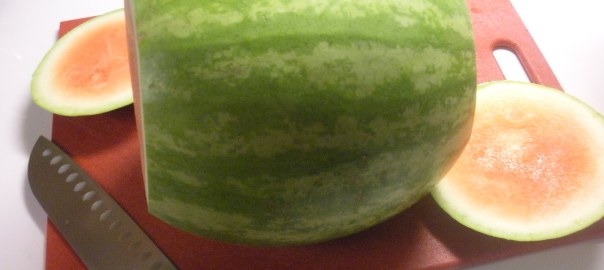
Use Your Melon! A no-mess guide to cleaning and prepping

For some people, cleaning fruit is no big thing.  They have a way they’ve always done it, they’re happy with what they do, and they’ve manged to make it through life just fine, thank you very much!  For others…cleaning fruit – especially melons and pineapple, and ESPECIALLY in front of other people, can become an exercise in risk management and self-image damage control.

When I was working my way through culinary school, I had a part-time job in the morning prepping food for a cafeteria that fed hundreds of people during the lunch hour.  I worked my way through all of the different culinary stations eventually, but the one that every single cook had to start at first was the salad bar.  Working the salad bar is a difficult job with very little in the way of public adoration; the total opposite of say, the saute Continue reading Use Your Melon! A no-mess guide to cleaning and prepping

Bacon Wrapped Chicken stuffed with Summer Veggies

I used to have a neighbor that would stand outside with me while our small children played, and we would talk about the things people generally talk about with their neighbors: our louder less considerate neighbors, our husbands, jobs, the current milestones of our kids, and of course, what was for dinner that night.  Continue reading Bacon Wrapped Chicken stuffed with Summer Veggies

Beef Stew – Slow Cooked Comfort

In general, I don’t use a lot of beef in my day-to-day cooking.  We tend to lean more towards ground turkey, or chicken breasts, or tofu.  But there are some times when you just have a craving for a rich satisfying bowl of beef stew, and this is the recipe to use for those occasions!  I made this for a family party, and it went over really well.  Most of the men at the party came back for seconds, and my dad said it was “really good stew”.  Which if you knew him, would tell you a lot. 🙂 Continue reading Beef Stew – Slow Cooked Comfort

Making Fondant

I have a serious case of split personality disorder when it comes to my relationship with homemade birthday cakes.

The more sentimental, doting, and hausfrau side of me feels that making someone a birthday cake from scratch is a true expression of love for the person and is part of the gift you give to them on their special day.  And then…there’s the more frazzled side of me who may just put the whole thing off out of indecision and intimidating expectations until the very last moment rush into Target to try to find a prefab cake in the cooler that I can try to pass off as special.  That, of course, is the worst case scenario, and I swear it only happened that one time.  Most often, the haufrau side begins Continue reading Making Fondant