Tag Archives: vegetables

This Salsa is the Rooster’s Beak

Salsa may not be a thing of great consequence, but when you use a great recipe that you love making and everyone loves eating, it settles that one little area of life for you.   No more random store-bought stuff, no more hoping a recipe you found somewhere will work.  This one is it for me, I’m good.

Happiness in a bowl...

In the past when I’ve been in a pinch, I’ve tried choosing a salsa in the grocery store.  And although I’m sure there is a place somewhere that sells something fantastic, I haven’t had much luck yet.  I don’t know about you, but I find the gigantic selection of salsas at grocery stores both overwhelming and disappointing.  I see them all towering there in front of me as I pace back and forth, as though one is going to stop me and say “Look. You don’t need to go back to those jars down there.  That guy over there?  He’s watered down and pasty.  See that one?  He’s so full of sugar and vinegar that he might as well be made out of just tomatoes.  They suck.  I’m the one you want.”.  But as the jars haven’t started talking to me (yet), I stand there, sigh, and finally pick one at the intersection of Costs too Much and Looks Organic.

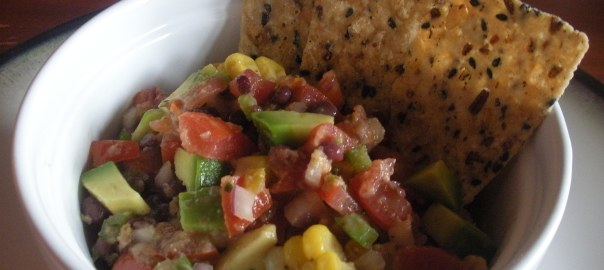
Being a person who loves veggies and who likes to cook, this is my solution to the salsa shopping dilemma.  This recipe is fresh, it’s chunky and it’s full of great flavors that make salsa worth eating.  I hope you enjoy it as much as we do!

Salsa Fresca – Makes approx. 4 cups

3-4 tomatoes, cut in half and squeezed of their juices

1 large green pepper, finely diced

1 jalapeno, seeded and minced (if you like heat, leave some of the seeds intact)

1 red onion, finely diced

1 avocado, pitted and small dice

1/2 c corn (fresh if possible, or frozen)

1/2 cooked beans of your choice (I used adzuki, but any bean will do!)

1/2 Tb salt

Freshly ground pepper

2 garlic cloves, minced (or 1 tsp garlic powder)

1 tsp chili powder

2 Tb cumin

1 Tb lime juice

1 Tb vinegar

2 tsp sugar

2 Tb olive oil

1/2 cup plain greek yogurt or sour cream, lowfat if possible

How-to:

This recipe is very simple to assemble, there are just a few tips that will make your final product really great:

  1. Prep all your veggies except your avocado.  They brown quickly, and this is one ingredient you are going to add just as you are about to serve it.
  2. Combine everything in a large mixing bowl except the yogurt, avocado and olive oil and let the mixture rest in your fridge for 3-8 hours.  The salt that was added is going to bring out the natural veggie  juices like the dickens, and this way you can just pour them off before you add the rest of your ingredients.
  3. After the fridge/de-liquiding time is over, stir the veggies around and give them a taste.  Some of the seasonings or salt may have been absorbed or poured off when you got rid of the excess juices, you can add more now if needed.
  4. Take 1/2 cup of the mixture and the olive oil and add it to a food processor or blender.  It does not have to be totally smooth, but you are looking to decrease the chunkiness of it.  Add this now smoothed-out mix and your yogurt to the mixing bowl and give it all a nice stir.  Retaste, adjust your seasonings as needed.
  5. Add your diced avocado, and you are ready for business!

There’s not much I don’t love this on: scrambled eggs, my brown rice, pan-fried fish, even cottage cheese.  And of course, chips!

I was wandering around Wikipedia today,  I thought I’d search under salsa and see if there were more things to learn.  It turns out, there were!  I found out a valuable lesson: there are salsa people, and then there are pico de gallo people.  I am a pico de gallo person.

I’ve always called this recipe salsa (and I guess really it is salsa fresca), but I think technically I should be calling it a pico de gallo.  According to those who know, salsa is supposed to be more of a sauce: Salsa Roja (red sauce), Salsa Verde (green sauce), Salsa Negra (yep,you guessed it, black sauce).   And although I’ve had some great salsas like this in restaurants around town, I don’t really want to make it at home.  I enjoy the texture and taste of fresh un-blended ingredients;  I like to see a whole melange of things going on in my salsa as opposed to the texture of the red-liquid type that sits soupily in its bowl, just waiting to fall onto my white t-shirt as it makes the trip to my mouth.

I also learned that Pico de Gallo literally means the “rooster’s beak”.  Nifty little fact!  And since I know you are dying to learn how such a tasty condiment would get that strange name, I’m going to share my new knowledge with you! 

“One of the sources for the name “rooster’s beak” could be the beak-like shape and the red color of the chilis used to make it. According to food writer Sharon Tyler Herbst, it is so called because originally it was eaten with the thumb and forefinger, and retrieving and eating the condiment resembled the actions of a pecking rooster.

Another suggested etymology is that pico is derived from the verb picar, which has two meanings: 1) to mince or chop, and 2) to bite, sting or peck. The rooster, gallo in Spanish, is a common metaphor for the hyper-masculine (“macho”) male in Mexican culture. One example of such machismo is taking pride in withstanding the spicy burn of chilis.”

Thanks, Wikipedia!  Learning is fun.

My Favorite Roasted Tomato Soup

I really like tomato soup in the fall.

I like it so much, I don’t think there’s a version of it out there that I haven’t liked: with rice or pasta, finished with cream, topped with tortilla strips and cilantro…they all make me really happy.

Except when it comes from a can.  Don’t get me wrong, I have totally been the girl who brings canned tomato soup in my thermos to work.  It just doesn’t make me particularly happy.  And, since it is tomato season, and I love to cook, here we are!  Ready to make a really great pot of homemade tomato soup that will make us all warm and cozy, leading us to break out any fuzzy socks that are waiting in the sock drawer and snuggle in.

For me, the key to a great tomato soup is to balance out the acidity of the tomatoes with some source of sugar.  Normally, plain white sugar is added to deal with this.  But a trick I learned a long time ago really solves the acidity problem in a way that doesn’t have us dumping sugar into our vegetables: add carrot.  I was taught to add chunks of carrot in the early steps of the soup making, and then to pluck them out before you served it.  It worked, and it did take away some of the bite of tomato soup.  But really, I thought, why take them out?  They add great color, great nutrients, and increase the sweetness factor in the finished product!  And they, like tomatoes, love to be roasted to develop all their great natural flavors.

I use onions, carrots, and fresh garden tomatoes drizzled with olive oil, salt and pepper as the base of this soup.
The three amigos, ready to get some crazy good flavor on.
They make a nice looking group, don’t they?  Nothing can really be bad when you start from someplace like this.
Roasted Tomato Soup
4 to 5 large tomatoes, cut into quarters and squeezed slightly
3 large carrots, peeled and cut into equal sized chunks
2 spanish onions, peeled and cut into chunks
3 large garlic cloves, peeled and cut in half
olive oil to drizzle
salt and pepper
6 cups vegetable or chicken stock
5 Tb tomato paste
1 14 oz can petite diced tomatoes
2 bay leaves
2 tsp dried thyme
1 Tb Spike seasoning, or any all-purpose seasoning
How-to:
  • Preheat oven to 400 degrees.  Take all your chopped veggies and lay them on a sheet pan or large casserole dish (there is going to be some liquid after they roast, so make sure you have a decent lip on the pan).  Drizzle olive oil, salt and pepper on them, and let the veggies roast on the bottom rack of the oven for 1 hour – taking them out to stir every 20  minutes or so. 

    Your kitchen is going to smell amazing. Just wait.
  • Once the veggies are done, pour the whole lovely lot of them into a large stock pot.  Don’t leave any of the juices in the baking dish!  Add your stock, tomato paste, can of diced tomato, bay leaf and seasonings, and bring to a boil.  Turn the heat down to medium or medium low and let it simmer for about 30 minutes.  Give it a taste, and adjust any seasonings if you need to.  If you feel like it isn’t sweet enough for you, then go ahead and add a tsp of sugar.  But remember, the amount of sugar you add is directly related to how much your soup will taste like canned soup!  So take it easy.
  • If you have an emersion blender – lucky you!  I really need to get one.  I only have a regular blender, so I get myself a large bowl and add about 3 ladles of soup into the blender and let it get nice and smooth before I put the now blended soup into the bowl.  I keep doing this until my soup pot is empty and I now have all my veggies blended together and happy.   **Important tip!  Don’t add too much hot soup to your blender (make it less than 1/2 full), or you will find that you and your walls are now covered in hot red liquid.

Here is where you get to make a choice about your finished soup.  Do you love it just as it is, all natural and slightly textured?  Or do you prefer to make it as smooth as you can?  If you are perfectly happy and can’t wait to dig in, then go get some kind of cheese sandwich and enjoy the rewards of your work!  Or, take this one extra step…

  • If you have a food mill or a fine strainer (or some cheesecloth, or painting mesh), pass the blended soup through it and it will remove any of the seeds and pulp that was left over from the blending step.

I used my fine strainer (or chinoise) and I got quite a bit of pulp out of the soup.

This step is totally optional!  For me, I usually only do it when I’m feeling very culinary or when the kids aren’t home to distract me.
Either way, I hope you take the plunge and start making your soup at home.  Try the original first, and then get crazy!  I like to confuse my kids by adding fun shaped pasta to it so they don’t give me any guff about how it is made from vegetables, but that’s just me.  Let me know how it goes!

Thai Peanut Noodles

Peanut noodles are just about the best things ever.  That is, I guess, unless you are allergic to peanuts, or hate fresh veggies, or have a problem with tasting joy.

I always have a lot of fun making stir-fry or asian noodle dishes, because as long as you get the main pillars of the recipe to stand up you’re free to add or remove anything your little heart desires.  This is not food chemistry, nothing will collapse or deflate or combust if you decide to tweak the recipe a little bit to your liking (I mean, you know, unless you’re subbing out red peppers for lighter fluid.  That would be  bad).

So here are the 3 pillars you need to stand up to make your fabulous dish:

  1. Nicely cooked rice noodles that aren’t too mushy or so undercooked that they lodge into your molars.
  2. A peanut sauce that is rounded out (this includes all the big Thai flavors – salty, sweet, tangy, and spicy).
  3. Veggies that are thinly sliced and that make you happy to eat.

Everything else is up to you!  Freedom!

My husband and I are trying to eat more vegetarian meals, so for us I decided to use tofu as a protein source.  But this dish is fantastic with cooked shredded chicken (rotisserie chickens were made for things like this).  I also happen to really like red peppers and cucumbers in mine, but you could add any kind of veggies you like: broccoli florets, carrot, celery, radish, bok choy…anything you want.  I like to garnish the noodles with chopped peanuts, but I didn’t have any on hand today and so I subbed in pumpkin and sunflower seeds.  Still super yummy!

Thai Peanut Noodles

Serves 4-6

1/2 package rice noodles

14 oz can bean spouts, drained

8 oz can water chestnuts, drained and sliced into strips

1 red onion, sliced into thin strips

1 red pepper, seeded and sliced into thin strips

1 cucumber, peeled, seeded and sliced into thin strips

1 pkg extra firm tofu (I like West Soy)

2 Tb Tamari (or soy sauce)

freshly ground pepper

1 tsp garlic powder

1 bunch scallions, chopped

For the Sauce:

3 cloves garlic, minced

1 tsp ginger, minced

*1/2 jar natural peanut butter (I like Smuckers Natural creamy)

3 Tb lime juice

6 Tb rice vinegar

2 Tb cider vinegar

1/4 c Tamari (or soy sauce)

5 Tb sugar (see * below)

fresh ground pepper

1 Tb Sriracha (this is the hot stuff…optional or to taste)

1 Tb Sesame oil

2 Tb water, if needed to thin the sauce

*If you want to use regular peanut butter, just decrease

or eliminate the added sugar listed in the recipe

For the tofu:

Preheat the oven to 375 degrees.  Slice the tofu in half width wise and press for 20 minutes until the liquid has been removed.  Cut the tofu into 1/4 inch strips and place in a large bowl.  Combine the 2 Tb tamari, garlic powder, and pepper in the bowl, and gently cover the tofu slices in the mixture.  Use cooking spray on a cookie sheet or sheet pan, and lay the tofu slices on it.  Cook for 10 minutes on one side, then flip over and cook 10 more minutes.  This baking helps make the tofu more firm and hold together better in the noodles – plus it helps my meat loving husband feel like he’s chewing on something besides noodles and veggies!  Once they are done, let them cool off and then cut them into smaller strips.

For the Sauce:

 Combine all the ingredients in a blender and blend until it is a smooth consistency.   You don’t have to use a blender, sometime I just mix them all up in a bowl!  But the blender does make it smooth.  Give the sauce a taste and decide if you need to adjust any of the flavors.  If it feels too tangy from the vinegar, add some more sugar or tamari.  If it seems too salty, add more sugar or water.  Just try to make sure you are hitting all the different flavors of Thai seasonings, and you should be good!

For the Rice Noodles:

In a large pot boil enough water that it will cover the noodles.  After the water has boiled, turn off the heat and remove the pan from the burner.  Add the noodles and let them sit in the hot water for 7 minutes, or until they are done.  Drain them in a colander and rinse with cold water until they are cooled off.

Now you are ready to take all the parts and combine them together into one big bowl of deliciousness!  I find that using my cleaned hands is a less messy and quicker way of mixing all these things together, rather than using tongs or forks.  Combine the noodles, sauce, veggies, and tofu until everything is really well-integrated.  Then, pop it in the fridge and let them flavors all come together for a couple of hours.

Don’t be surprised if when you take the noodles out of the fridge they have soaked up a lot of the peanut sauce.  If you need to, add a little bit of hot water to them and let them come to room temp, and you will be ready to go.

Super Fresh Quinoa Salad

I love quinoa.  I love saying it to my kids “Look guys! It’s keen-wa! Keeen-waaaa!” and having them think I’m a huge nerd.  I love that you can made it plain as a side dish when you are really sick of making rice and pasta, or you can go crazy and start adding all kinds of goodies to it (golden raisins, pumpkin seeds, feta cheese, all types of veggies, tofu, meats, toasted almonds, the list goes on and on!) and eat it as a main dish.  Most of all, I love that is it a super grain.  It has all 8 amino acids making it a complete source of protein for vegetarians, it is full of fiber and B vitamins, and it is gluten-free, and it’s delicious.  It’s amazing!

I’ve made quinoa lots of ways, but this one sounded good to me today: a fresh salad seasoned with lemon juice and vinegar using some of the veggies I found at the Farmer’s Market this week.  This recipe is vegan/vegetarian, gluten-free and low-fat.  But don’t worry, it’s also super-delicious.

Quinoa Salad

1 cup quinoa

2 cups vegetable stock

1 Tb olive oil

1 tsp fresh ground pepper

Fresh spinach, about a handful

1/2 of a large zucchini, small dice

1/2 yellow squash, small dice

1 tomato, squeezed of juice and small dice

1/2 onion, small dice

1 tsp Cajun seasoning (or garlic and red pepper)

1 clove garlic, minced (or 1 tsp garlic powder)

1 Tb lemon juice

2 Tb wine vinegar, white or red

Directions

  1. In a medium saucepan, bring the veg stock and olive oil to a boil.  Rinse the quinoa under water in a fine mesh strainer and then add it to the stock (if you don’t have a fine mesh strainer, just submerge the quinoa in fresh cold water 3 of 4 times until the water looks clear).  Reduce the heat to medium low, and let simmer for 15-20 minutes.  You will know when it is done when the cute little curlicues have loosened off the quinoa grains and they take on a softer texture.
  2. While the quinoa is cooking, you can prepare your veggies!  To a large saute pan add the zucchini, squash and onion (salt and pepper your veggies!) and saute for 3-5 minutes or until just beginning to soften.  Near the end of the cook time, add your minced garlic so it doesn’t burn.  Add the lemon juice and vinegar, remove from heat and place in a large bowl to cool.  Take your handful of spinach, remove the stems, and chop it into thin long pieces (also called chiffonade).  Add the tomato and spinach to the veggies and mix in gently.
  3. Once the quinoa is cooked and all the stock has been absorbed, put in a large bowl to cool.  Spread the quinoa out to the edges of the bowl to allow the grains to cool quickly, and stir often.  
  4. After 5 minutes, you can add your bowl of veggies and mix in with the quinoa.  Taste your salad, make sure you are happy with the amount of salt, vinegar and lemon juice.

This salad can be eaten warm or cold, it is fantastic either way.  Quinoa is such a light grain, it is really wonderful as part of a picnic or to bring to a potluck as it hold up really well throughout the day.  It would also be a nice touch to add some feta or top with some salted sunflower or hemp seeds.  Use your imagination 🙂

There are hundreds of ways to make salads and sides from quinoa, it is a great grain that more people need to discover!  Let me know some of your favorites.

Eggplant Rollatini!

Whenever I grocery shop, I always stop in the produce section to look at the lovely plump eggplants, just sitting there in their cozy little group.  They just seem so…inviting.  I want to eat them!  I want to cook with them and have them turn out delicious!  And most of all, I want to do it in a way that doesn’t batter and fry them into an unrecognizable state.

Eggplants are one of those foods that act just like sponges; they soak up whatever you surround them with.  So I decided to surround my eggplant dish with things that taste excellent and at the same time don’t give me post-dinner calorie remorse.  It fits into my low-fat diet very well with the additions of the fat-free ricotta and the nonfat greek yogurt; it also makes my tummy happy to know that it is full of delicious veggies and no gluten. Continue reading Eggplant Rollatini!

Bacon Wrapped Chicken stuffed with Summer Veggies

I used to have a neighbor that would stand outside with me while our small children played, and we would talk about the things people generally talk about with their neighbors: our louder less considerate neighbors, our husbands, jobs, the current milestones of our kids, and of course, what was for dinner that night.  Continue reading Bacon Wrapped Chicken stuffed with Summer Veggies

8/27/11 Gourmet Group – Things on a Stick!

Grilled stuffed tomatoes, lamb kabobs

In honor of the Minnesota State Fair being open, our hostess chose the Things on a Stick theme 🙂

Here are the courses that people brought –

  1. Appetizer: Lettuce wraps with grilled skewered zucchini and marinated tofu.  Served with cucumber and red pepper matchsticks soaked in rice vinegar, sugar and garlic; bean sprouts sauteed in tamari.
  2. Side: Salad on a stick – mozzarella and grape tomato skewers served in a cup with fresh pesto.  Polenta bites served with creamy cumin dipping sauce.
  3. Side: Grilled tomatoes stuffed with chunky artichoke pesto
  4. Main: Herbed Lamb kabobs and Spiced Chicken kabobs
  5. Dessert: Cheesecake pops and bananas on a stick Continue reading 8/27/11 Gourmet Group – Things on a Stick!